Start with your key lights. Every subject in your studio should have a key light directly on them. It should ideally hit them in the face or wherever you wish to focus attention. The more important the subject, the more important his or her key light.
Define your subjects with back lights. Too much light on the faces of your subjects can blend them into the background. To distinguish them from their surroundings, place a back light behind each subject. The back light is smaller than the key light and is shined either behind the subject or slightly upward. The goal is to make your subjects appear more three-dimensional.
Remove shadows with fill lights. When a studio fills up with conflicting light sources, strange shadows can appear. Get rid of them by placing fill lights at angles with the key lights and back lights. You will need to move the fill lights around to get your desired effect. Shadows are unpredictable so be patient and adapt.
Brighten the background. Sometimes the background gets lost in all the studio lighting. If the background is important, then light it separately from your subjects using the same rules. When you do this you, can often eliminate the back lights for your subjects since the background will already be lit.
Light for the action. Static studio lighting is fine if your subjects don't move. If your studio work involves blocking or other movement, then keeping key lights and back lights on each subject becomes impossible. In that case, light the entire studio as if it were a bright cloudy day. There should be plenty of light everywhere but no shadows. This can be achieved with indirect lighting and gels over the lights.
Add or remove lights to fit your desired outcome. Sometimes a special effect is the goal. If you want all the attention to be on a single person, then hit him or her with a key light and a back light, and leave the rest of the studio dark. If you want to shift attention from one subject to another, then shift the lighting or shift the subjects. If you want your subject to be an anonymous shadow then hit them with a bright back light alone.
1. Start in Darkness. Make sure there are no default lights, and there's no global ambience. When you add your first light, there should be no other light in the scene.
2. Add your Key Light. The Key Light creates the subject's main illumination, and defines the most visible lighting and shadows. Your Key Light represents the dominant light source, such as the sun, a window, or ceiling light - although the Key does not have to be positioned exactly at this source.
Create a spot light to serve as the Key. From the top view, offset the Key Light 15 to 45 degrees to the side (to the left or right) of the camera. From a side view, raise the Key Light above the camera, so that it hits your subject from about 15 to 45 degrees higher than the camera angle.
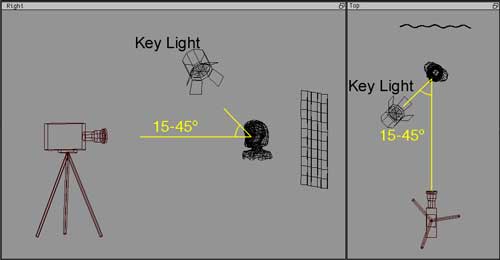
The key light is brighter than any other light illuminating the front of the subject, is the main shadow-caster in your scene, and casts the darkest shadows. Specular highlights are triggered by the Key Light.
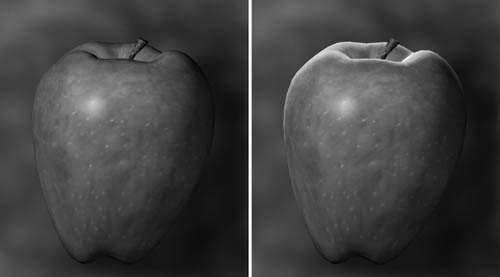
NOTE: Be sure to stop and do test-renders here. Your "one light" scene (with just the key light) should have a nice balance and contrast between light and dark, and shading that uses all of the grays in between. Your "one light" should look almost like the final rendering, except that the shadows are pitch black and it has very harsh contrast - see the GIF animation at the top of this page, while it only has the Key light visible.
3. Add your Fill Light(s). The Fill Light softens and extends the illumination provided by the key light, and makes more of the subject visible. Fill Light can simulate light from the sky (other than the sun), secondary light sources such as table lamps, or reflected and bounced light in your scene. With several functions for Fill Lights, you may add several of them to a scene. Spot lights are the most useful, but point lights may be used.
From the top view, a Fill Light should come from a generally opposite angle than the Key - if the Key is on the left, the Fill should be on the right - but don't make all of your lighting 100% symmetrical! The Fill can be raised to the subject's height, but should be lower than the Key.

At most, Fill Lights can be about half as bright as your Key (a Key-to-Fill ratio of 2:1). For more shadowy environments, use only 1/8th the Key's brightness (a Key-to-Fill ratio of 8:1). If multiple Fills overlap, their sum still shouldn't compete with the Key.
Shadows from a Fill Light are optional, and often skipped. To simulate reflected light, tint the Fill color to match colors from the environment. Fill Lights are sometimes set to be Diffuse-only (set not to cast specular highlights.)
4. Add Rim Light. The Rim Light (also called Back Light) creates a bright line around the edge of the object, to help visually separate the object from the background.
From the top view, add a spot light, and position it behind your subject, opposite from the camera. From the right view, position the Back Light above your subject.
Adjust the Rim Light until it gives you a clear, bright outline that highlights the top or side edge for your subject. Rim Lights can be as bright as necessary to achieve the glints you want around the hair or sides of your subject. A Rim Light usually needs to cast shadows. Often you will need to use light linking to link rim lights only with the main subject being lit, so that it creates a rim of light around the top or side of your subject, without affecting the background:
No comments:
Post a Comment